Importing your bank transactions into QuickBooks Desktop helps ensure the accuracy of your financial transactions and accounting data. This article enlightens you with a step-by-step process to download bank feed transactions in QuickBooks desktop software.
Steps to download the transactions in QuickBooks
When you connect to QuickBooks software for the first time, the software will by itself download the maximum number of transactions available from your financial institution. It depends on your financial institution, and you can even get a year of historical transactions. Most banks download the previous 90 days. You can follow the below steps for downloading the transactions in QuickBooks:
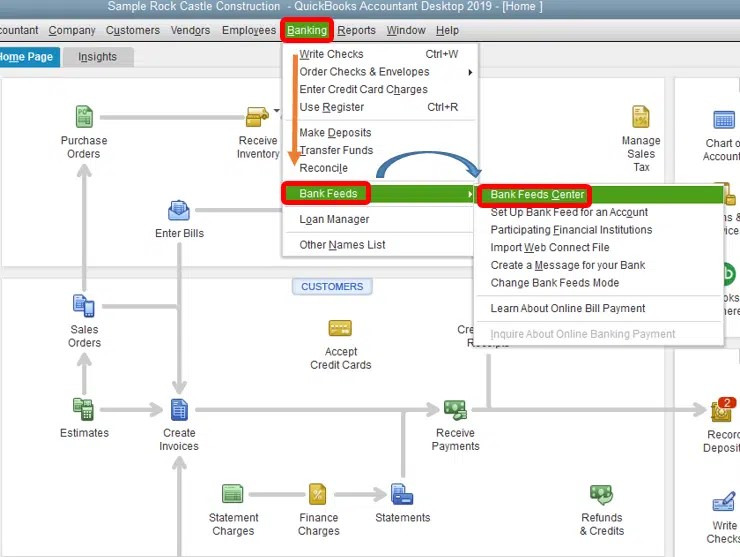
- Navigate to the banking menu.
- Select 'bank feeds center from the 'bank feeds' option.

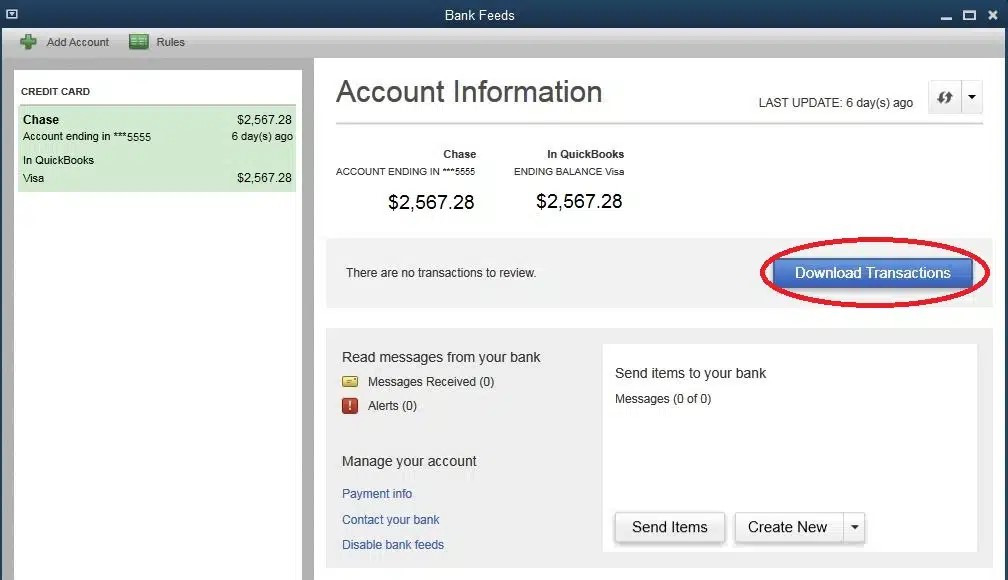
- Choose the account that you want to connect from the bank accounts list. It is optional to delete or edit items by hitting a click on the drop-down in the send items to the bank section.
- Once you are ready to get the transactions, tap on the download transactions. Also, note that if you have already downloaded the transactions, and haven't reviewed them yet, go for the transaction list.

- Now choose for the synchronize tab. in case you only want to download transactions for a specific account, pick the sync this account tab. You can download transactions for all your accounts at the same bank and choose the sync all for this bank option.
- Now, enter your Pin or Password for connecting to the bank in the access window.
- Pick the OK tab.
- You would now have to match or add any new ones, as you have downloaded the transactions. An important point to remember is that you can delete the remaining transactions. Or delete the statement. After you have deleted the downloaded transactions, they can't be downloaded again. And this would avoid the chance of duplicate entries.
Steps to download bank transactions using web connect in QuickBooks
It should be noted that some banks will let you set a particular date range for the downloads. If your bank doesn't provide you with this option, you can automatically obtain the maximum number of transactions available the first time you download. This entirely depends on the bank and might range from 30, 60, 90, or even for more days. There can be two ways to import transactions using web connect.
- At first, open your QuickBooks.
- You should head to the banking menu.
- And move to the bank feeds and pick the banking center.
- Now look for your bank and tap on the download transactions. This will open a browser window to the bank's website.
- After that sign into the bank's website in order to download the web connect file.
- In case you are outside of QuickBooks.
- You will first have to open a web browser and head to the bank's website.
- Further, sign into your bank account by practicing the normal process.
- Also, download the transactions as QuickBooks web connect .qbo file.
- It should be noted that the method for downloading QuickBooks web connect files might vary from bank to bank. If you aren't sure how to perform the process, check your bank's website and look for their steps. Or reach out to the nearest branch for help.
- After you have the web connect file, carry out the steps to import it into the QuickBooks desktop.
We are hopeful that this article helped you in downloading bank feed transactions on the QuickBooks desktop successfully. However, if you are still puzzled about selecting the right option, then you must get in touch with our 24/7 QuickBooks desktop support team via 1-800-761-1787.


